Loops
Learning Objectives
- Describe what loops are.
- Understand the differences and different uses of
forloops andwhileloops.- Understand how to use
breakandnextstatements inside loops.Suggested Readings
- Chapter 21 of “R for Data Science”, by Garrett Grolemund and Hadley Wickham
- Chapters 11 of “Hands-On Programming with R”, by Garrett Grolemund
Similar to conditionals (remember those if / else statements?), loops are another kind of “flow control” - that is, code that alters the otherwise linear flow of operations from the top of a script straight through to the end. The idea is simple: a loop is a block of code (i.e., a sequence of commands) that R will execute over and over again until some termination criterion is met.
The main two types of loops are for and while loops.
The for loop
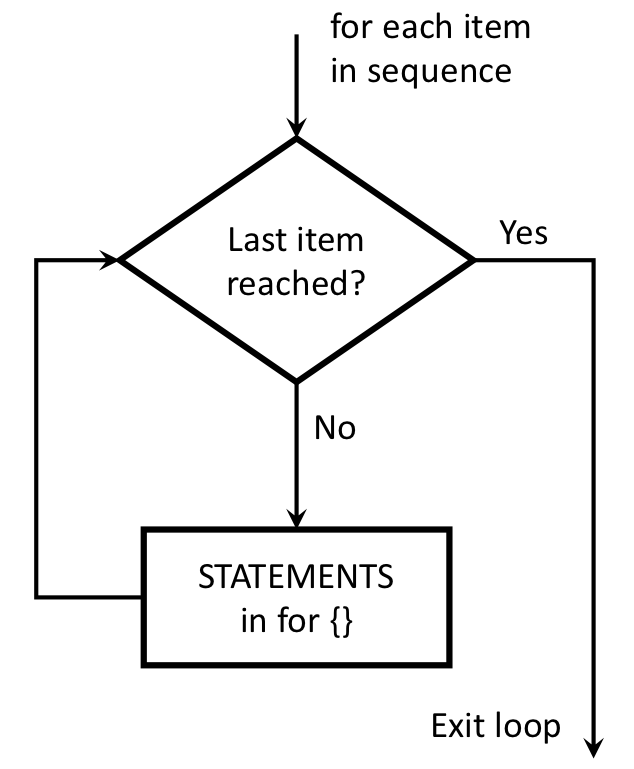
Use for loops when there is a known number of iterations. The basic format of a for loop goes like this:
for (VALUE in SEQUENCE) {
  STATEMENT1
  STATEMENT2
  ETC
}
In a for loop, R runs a fixed number of iterations determined by the SEQUENCE statement, which is a sequence of values. In each iteration, the variable VALUE will take the next value in SEQUENCE. Once we’ve exhausted all of the values in SEQUENCE, the loop terminates and the flow of the program continues down the script. This schematic illustrates the idea:
Looping over numbers
It is common to use a sequence of integers for the values in SEQUENCE. The simplest way to do this is to use the : operator. For example, the code 1:10 creates the integers 1 through 10. The following for loop uses this sequence to print out each integer in the sequence:
# Print the numbers from 1 to 10
for (i in 1:10) {
    print(i)
}
## [1] 1
## [1] 2
## [1] 3
## [1] 4
## [1] 5
## [1] 6
## [1] 7
## [1] 8
## [1] 9
## [1] 10You can also use the seq() function to generate a specific sequence of numbers over which to iterate. This can be useful if you want to control the step size (in the example below, it’s 2):
# Print the numbers from 1 to 10 with a step size of 2
for (i in seq(1, 10, by=2)) {
    print(i)
}
## [1] 1
## [1] 3
## [1] 5
## [1] 7
## [1] 9Looping over other things
R will loop over any sequence you create. For example, you can loop over a vector of characters (The c() function creates a “vector”…we’ll get to those next lesson):
x <- c('If', 'you', 'want', 'to', 'view', 'paradise,', 'simply', 'look',
       'around', 'and', 'view', 'it.')
for (i in x) {
    print(i)
}
## [1] "If"
## [1] "you"
## [1] "want"
## [1] "to"
## [1] "view"
## [1] "paradise,"
## [1] "simply"
## [1] "look"
## [1] "around"
## [1] "and"
## [1] "view"
## [1] "it."You can also loop over logical values. The following loop will print out the value when it is TRUE:
x <- c(TRUE, FALSE, FALSE, TRUE, FALSE, FALSE, FALSE, TRUE, FALSE)
for (i in x) {
    if (i == TRUE) {
      print(i)
    }
}
## [1] TRUE
## [1] TRUE
## [1] TRUENested for loops
You can have loops inside loops! This is useful when working on things that have more than one dimension. For example, let’s print out a 5 x 5 rectangle out of asterisks (*) by looping over rows and columns:
n <- 5
for (row in seq(n)) {
    for (col in seq(n)) {
        cat("*")
    }
    cat('\n') # Print a new line
}
## *****
## *****
## *****
## *****
## *****This will come in handy when working with 2-dimensional objects like data frames.
The while loop
A friend calls her programmer roommate and says, “while you’re out, buy some milk”…her roommate never returned home.

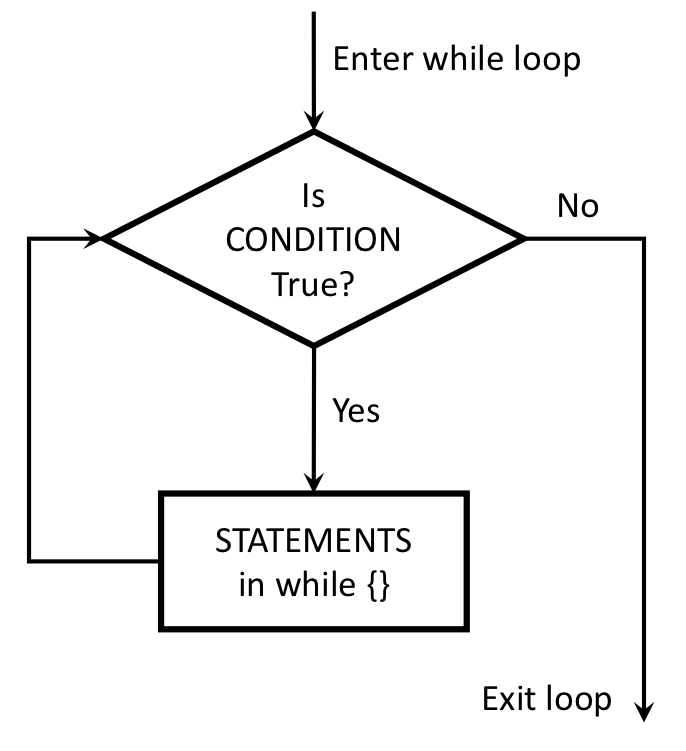
Use while loops when there is an indeterminate number of iterations. The basic format of the loop looks like this:
while (CONDITION) {
  STATEMENT1
  STATEMENT2
  ETC
}
The code corresponding to CONDITION needs to produce a logical value, either TRUE or FALSE. Whenever R encounters a while statement, it checks to see if the condition is TRUE. If it is, R goes on to execute all of the commands inside the curly brackets. R will then continue to repeat this process until the condition is FALSE. Once that happens, R jumps to the bottom of the loop (i.e., to the } character), and then continues on with whatever commands appear next in the script. This schematic illustrates the idea:
Example:
The following function prints each power of 2 up to an upper limit:
powersOfTwo <- function(upperLimit) {
    n = 1
    while (n < upperLimit) {
        print(n)
        n = 2*n
    }
}powersOfTwo(5)## [1] 1
## [1] 2
## [1] 4powersOfTwo(100)## [1] 1
## [1] 2
## [1] 4
## [1] 8
## [1] 16
## [1] 32
## [1] 64The break and next statements
break
You can force a loop to stop by inserting the break statement in the loop. In a nested loop, the break statement exits from the innermost loop that is being evaluated. Here’s an example:
for (val in 1:5) {
    if (val == 3) {
        break
    }
    print(val)
}
## [1] 1
## [1] 2In this example, we iterate over the consecutive numbers from 1 to 5. Inside the for loop we have used a if condition to break if the current value is equal to 3. As we can see from the output, the loop terminates when it encounters the break statement.
next
A next statement is useful when we want to skip the current iteration of a loop without terminating it. On encountering next, R will jump to the end of the loop and start the next iteration. Here’s an example:
for (val in 1:5) {
    if (val == 3) {
        next
    }
    print(val)
}
## [1] 1
## [1] 2
## [1] 4
## [1] 5In the above example, we use the next statement inside an if statement to check if the value is equal to 3. If the value is equal to 3, the current evaluation stops (i.e. the value is not printed) and the loop continues with the next iteration.
Page sources:
Some content on this page has been modified from other courses, including:
- CMU 15-112: Fundamentals of Programming, by David Kosbie & Kelly Rivers
- Danielle Navarro’s website “R for Psychological Science”
Tuesdays | 12:45 - 3:15 PM | Dr. John Paul Helveston | jph@gwu.edu
Content 2020 John Paul Helveston. See the licensing page for details.